


Usahihi sahihi wa PE flange adapters ni msingi wa uhusiano imara bomba. Wakati wewe kuweka sawa, pamoja kushughulikia hata shinikizo katika eneo kufunga. Hii inazuia kuvuja na kupunguza shida ya mitambo. Kwa upande mwingine, upotovu mdogo unaweza kusababisha matatizo ya gasket au upotovu kama muda hupita.
Ni nini PE Flange Adapter?
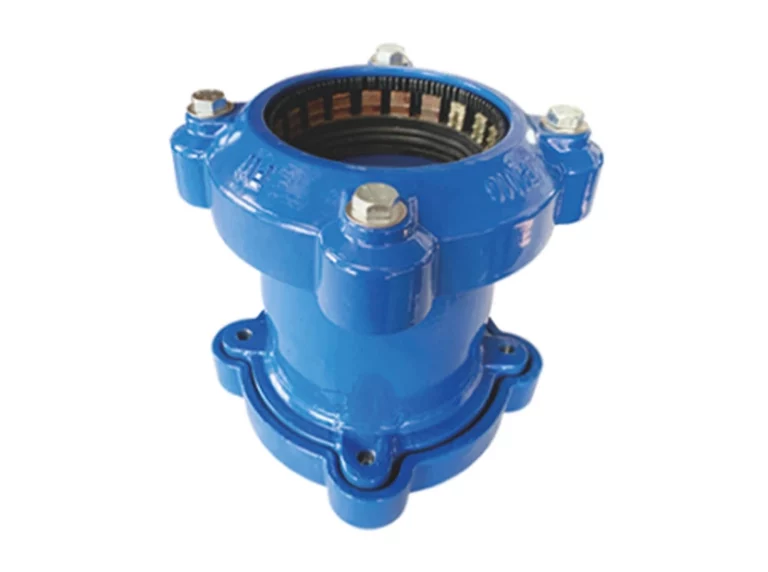
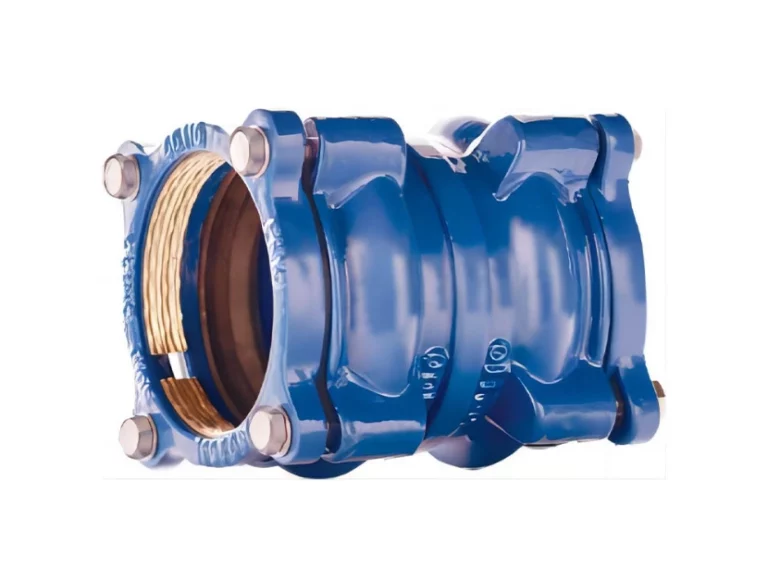
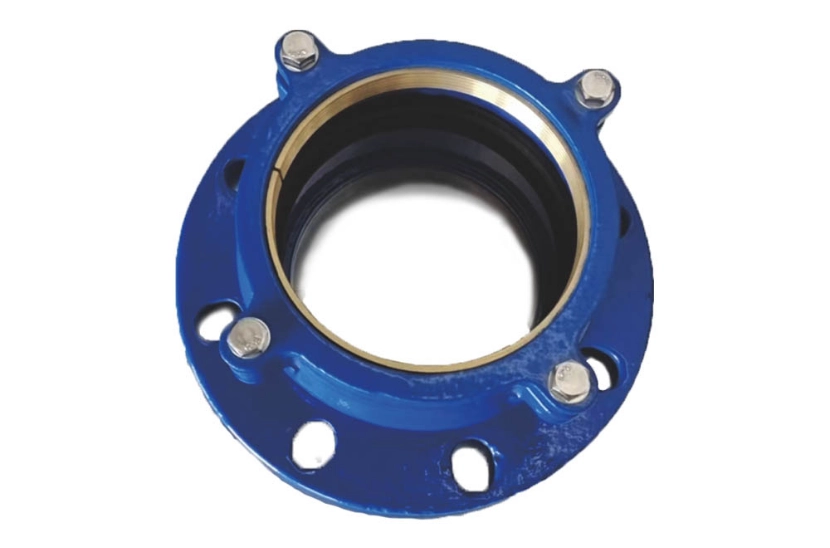
A Adapter ya flange ya PE hutumika kama fitting kwamba kuunganisha bomba polyethylene (PE) kwa sehemu flanged kama valves, bomba chuma, au gauges. Bidhaa huunganisha PE bomba na chuma bomba au valve, flowmeter, shinikizo gauge na vifaa vingine vya msaada. Kawaida ina mwili wa socket, pete ya kufunga, flange ya gland, na bolts. Kwa kufunga, inategemea pete ya mpira ya dovetail groove ambayo inashikilia chini ya shinikizo la juu.
Wajenzi mara nyingi huchagua polyethylene yenye wiani mkubwa kwa sababu ya uwezo wake wa kubeba na upinzani wa kutu. Baadhi ya mipangilio mchanganyiko katika PVC kwa ajili ya nguvu ya ziada na utulivu dhidi ya kemikali. Unaona vifaa hivi katika mistari ya maji, mitandao ya gesi, na mifumo ya kiwanda. Huko, wanashughulikia mabadiliko ya mizigo kwa uaminifu.
Kwa nini Upatikanaji ni Muhimu Wakati wa Ufungaji
Alignment kudhibiti jinsi pete muhuri squeezes sawa kama wewe tighten bolts. Kama uso flange ni’ t kiwango au shimo bolt don’ t line juu, squeeze inakuwa uneven. Matokeo yake, unaweza kukabiliana na masuala haya:
- Kuvuza katika maeneo ambayo don’ t vyombo vya habari vya kutosha
- Msingi sana juu ya bolts au gaskets
- Harari ya haraka kutoka kwa shakes au bends
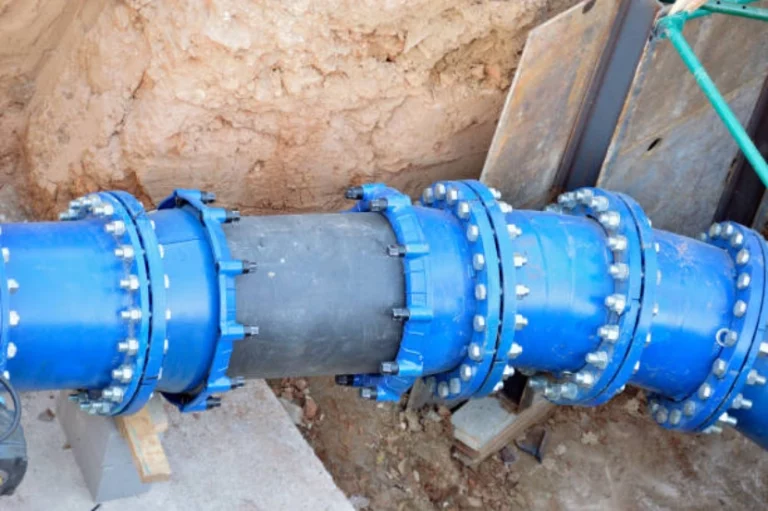
Kuunganishwa vizuri huweka vitu vya kuvuja na kuongeza maisha ya adapter na washirika wake. Conflex, mtengenezaji mtaalam wa aina mbalimbali za uhusiano wa bomba la viwanda na bidhaa za ukarabati kwa zaidi ya miaka 15, inaonyesha kupitia kazi yao kwamba ufungaji wa akili huongeza uvumilivu katika mazingira ya maji, mafuta, na gesi ulimwenguni kote.
maandalizi kabla ya kufunga PE Flange Adapter
Kazi ya maandalizi huweka msingi kabla ya kuanza kuimarisha. Unaweza kuepuka maumivu makubwa ya kichwa baadaye kwa kuangalia sehemu kwa dakika chache tu.
Kufanya uchunguzi wa kabla ya ufungaji
Angalia kila sehemu kwa karibu. Surfaces flange haja ya kukaa mbali na vifungu au dings. Gaskets lazima kujisikia laini, bila nicks au bends. Hakikisha vifaa vya adapter vinalingana na bomba. Kuunganisha tofauti na plastiki kunaweza kusababisha unyanyasaji usiolingana katika mabadiliko ya joto.
Kuweka zana zako katika safu: funguo la torque, pin za usambazaji, mafuta ya mafuta, na gaskets za haki kama mtengenezaji anavyopendekeza.
Kuanzisha eneo la kazi
Weka nafasi safi ili kuzuia uchafu au grit kutoka kuharibu maeneo muhuri. Kuchukua bomba thabiti hivyo wao kushinda’ t kwenda kama wewe kuweka mambo pamoja. Kuweka usalama kwanza. Vaa gloves na ulinzi wa macho wakati wewe kuinua flanges nzito au kugeuka wrenches.
Kupima na Kuweka alama Pointi za Uhusiano
Vipimo sahihi kuhakikisha bomba slides katika socket katika kina sahihi. Mark bomba mwisho kuonyesha urefu sahihi fit. Cut makali moja kwa moja, bure ya maeneo magumu. vidokezo laini ahadi hata gasket squeeze mara moja bolt ni chini.
Kuunganisha PE Flange Adapters Wakati wa Ufungaji
Pamoja na maandalizi kufanyika, kuzingatia usawa. Lengo linabaki moja kwa moja: uso flange lazima line up gorofa, na mashimo bolt haja ya mechi spot-on kabla ya kutumia torque.
Kuweka adapter kwa usahihi
Kuanza kwa kuangalia mashimo ya bolt kwenye flanges zote mbili. Slip katika bolts mbili kutoka upande kinyume, ufungufu, kuweka mambo katika nafasi. Tumia kiwango cha roho au makali ya moja kwa moja kuangalia pembe. Don’ t kushinikiza vipande ngumu. Hiyo inaweza kugeuka threads au kuumiza muhuri.
Katika mifumo mikubwa, kusema DN300 au zaidi, zana za laser zinapatikana. Wanathibitisha kuzingatia umbali mkubwa ambapo kuchunguza macho peke yake kunaweza kupoteza alama.
Kutumia Vifaa na Vifaa vya Ushirikiano
Vifaa vya kawaida vya usambazaji vinavyotumiwa katika ufungaji
- Torque wrenches kwa nguvu thabiti tightening
- Pini za usambazaji kuendesha maeneo ya bolt
- Viwango vya Roho au vifaa vya laser kwa ajili ya mipangilio kubwa
Vifaa hivi huweka mambo kuwa sahihi, hata kama ardhi imeelekea au hali zinachangamoto usawa wa mikono.
Tips kwa ajili ya kufikia usahihi alignment na UKIMWI
Kugeuka bolts kidogo kwa kidogo katika utaratibu crossscross, si moja baada ya nyingine kuzunguka pete. Hii kuenea nguvu laini juu ya gasket. Baada ya kuchukua wanandoa, tazama juu ya usawa tena kabla ya kuhamia kwa torque kamili kutoka kwa mtengenezaji.
Kama mambo hubadilika wakati wa mchakato, nyuma off kugusa na kurekebisha nafasi. Kisha endelea. Kamwe kurekebisha kwa cranking upande mmoja ngumu zaidi. Hiyo inaweza kubeba uso wa flange.
Kuhakikisha Uhusiano na Teknolojia Sahihi za Kutengeneza Bolt
Mara moja alignment inakaa haki, bolt ni chini vizuri kwa matokeo yenye nguvu chini ya shinikizo hadi 2.5 MPa, kama Conflex inaeleza.
Hatua kwa hatua Bolt tightening mchakato
- Slide bolts wote freely katika mashimo mechi.
- Kuanza kuimarisha katika mfano wa nyota (mfululizo wa msalaba).
- Kujenga torque katika hatua, kwa kawaida 30%, 60%, kisha 100% ya thamani ya mwisho.
- Angalia hata spacing kati ya flanges katika kila hatua.
- Kufunga na torque kamili katika kila bolt, kufuata specs bidhaa.
| Ukubwa wa Bolt | Inapendekezwa Torque (Nm) | Kawaida Bolt Hesabu |
| M16 | 80–100 | 8–12 |
| M20 | 120–150 | 8–12 |
| M24 | 180–220 | 12–20 |
Makosa ya kawaida ya kuepuka wakati wa tightening bolts
Crank ngumu sana, na unaweza warp ductile chuma flanges au kuvunja mpira gaskets nyuma kurekebisha. Kufunga kwa usawa, na kuvuja huonekana wakati shinikizo la maji linapiga maeneo dhaifu. Kufikia viwango vya torque iliyopendekezwa. Don’ t kudhani kwa mkono hisia.
Kufanya baada ya ufungaji Checks na matengenezo Tips
Baada ya kuanzisha inaonekana kufanyika, mara mbili kuangalia kufunga katika uaminifu katikati ya shakes au joto ukuaji katika matumizi halisi.
Kuthibitisha Uongozaji wa Mwisho Baada ya Ufungaji
Scan mduara kamili ya flanges zote mbili kwa jicho. Hata mawasiliano ishara nzuri fit. Angalia mistari ya squeeze gasket. Uneven kina pointi kwa misalignment. Kuhakikisha kabla ya vipimo vya shinikizo kuanza.
Ongeza shinikizo polepole. Angalia viungo kwa drips katika viwango vya chini kwanza. Hii inaepuka mapumziko ya ghafla ikiwa mkutano ulifanya makosa mapema.
matengenezo ya kawaida kwa utendaji wa muda mrefu
Mazoezi ya Kawaida ya Ukaguzi
Rudi kwenye tightness bolt sasa na kisha katika mipango ya kuangalia raundi. Fanya hili hasa baada ya joto swings au shakes katika nyumba pampu au mimea ambapo vikosi hizo hit nguvu.
Spot kutu karibu na nuts au washers. Badilisha sehemu mbaya mara moja. Chagua chaguzi za chuma cha pua wakati unaweza kwa ajili ya nguvu bora ya kukaa.
Hatua za kuzuia kwa ajili ya kudumu
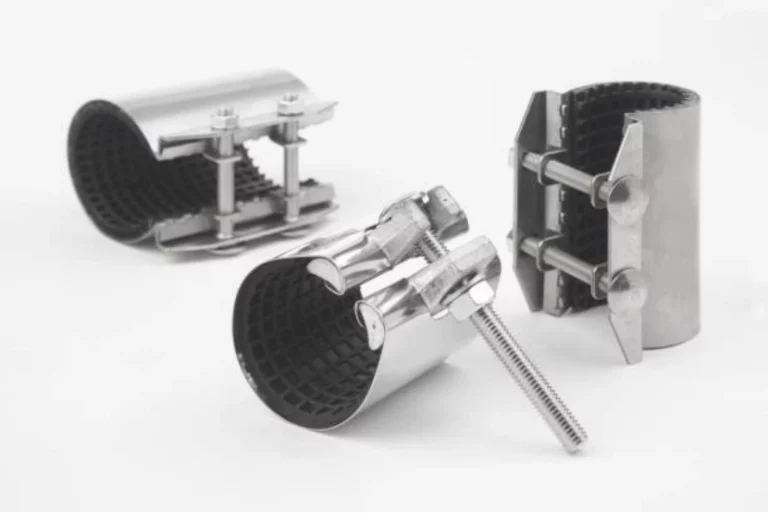
Mafuta madogo mara nyingi huweka bila kuchukua yote tofauti. Jaribu kuboresha chaguzi kama Semi / Full Circle Mini Kurekebisha Clamp hutoa ukarabati wa haraka wa kuvunjika kwa bomba lolote na kuvuja chini ya shinikizo. Hizi huweka mambo pamoja kwa muda mfupi mpaka uweze kufanya kazi kamili salama nje ya mtandao.
Kubadilisha gaskets zamani hivi karibuni. Hii inazuia matatizo kuenea kwenye maeneo ya karibu. It’ s matumizi ya akili ikilinganishwa na gharama za kufunga mstari.
Bidhaa zinazohusiana ambazo zinasaidia ufungaji sahihi na matengenezo
Vitu vingine vipande vizuri kufanya mifumo kuendesha laini. Wao rahisi kuanzisha kazi au kushughulikia matatizo ghafla.
PVC Flange Adapters na Utanganisho Wao na Mifumo ya PE
Adapters ya flange ya PVC timu pamoja na PE wale katika mistari mchanganyiko. Kwa mfano, wao kujiunga ngumu PVC mains bend matawi HDPE. Asili yao ya kuthibitisha kutu inafaa maeneo yenye kioevu kali, kama vile mimea ya kemikali. Wao kuunda viungo imara kama aina PE.
Pipe Repair Clamps kwa ajili ya Fast Fixes
Kama kuvuja kuonekana wakati wa kazi, unaweza’ t daima kuacha mstari wote. Hiyo’ s wakati chuma cha pua Repair Clamp ni hasa kutumika kwa ajili ya kukarabati haraka ya kuvuja bomba. Waendeshaji muhuri kuvunja haraka bila kuvunja mbali flanged maeneo. Hii inathibitisha muhimu katika matengenezo ya dharura katika maeneo ya mbali au mistari muhimu ya kulisha hospitali au mitandao ya jiji.
Spot-on alignment inaweza kujisikia kama kazi ya ziada mwanzoni. Hata hivyo inaokoa kwenye bili za matengenezo na inaongeza maisha ya kila sehemu, kutoka valve hadi vipimo katika mistari ngumu ya usambazaji. Katika ujenzi mpya au huduma inayoendelea, kushikamana na tabia imara za usawa huhakikisha kazi thabiti kwa miaka mingi. Miradi ya kimataifa kutumia Conflex’ suluhisho ngumu s kuthibitisha hii mara kwa mara katika mazingira ya kila siku.
Maswali
Q1: Jinsi gani nitaangalia kama PE yangu flange adapter ni aligned kwa usahihi?
Tumia ukaguzi wa kuona pamoja na zana za kupima kama viwango vya roho; kuhakikisha viwango sawa kati ya flanges kabla ya tightening mwisho.
Q2: Je, ninaweza kutumia PVC flange adapters pamoja na PE bomba?
Ndiyo, kutokuwa wao kushiriki vipimo sambamba na shinikizo ratings inafaa kwa ajili ya vifaa hybrid kuhusisha vifaa tofauti.
Q3: Nini kinatokea kama mimi zaidi-tighten bolts juu ya flange adapter?
Over-tightening inaweza deform gaskets au crack flanges kusababisha kuvuja uwezekano mara moja pressurized.
Q4: Mara ngapi ninapaswa kuangalia upya tightness bolt baada ya ufungaji?
Angalia uhusiano mara kwa mara wakati wa mzunguko wa matengenezo ya kawaida hasa baada ya mabadiliko makubwa ya joto au vibrations mfumo.
Q5: Je, bomba kukarabati clamps ufumbuzi wa kudumu?
Wao ni hasa iliyoundwa kama kurekebisha haraka lakini inaweza kutumikia muda wa kati kulingana na shinikizo mfumo; Badilisho kamili lazima kufuata wakati wa downtime iliyopangwa.